
Exclusive Excerpt: “In the French Kitchen with Kids” by Mardi Michels
It’s never too early to teach little ones how to whip up a feast French-style. And with Mardi Michels’ easy as pie recipes, kids of all ages will be begging to lend a hand in the kitchen
Excerpted from In the French Kitchen with Kids by Mardi Michels. Copyright © 2018 Mardi Michels. Photography © Kyla Zanardi. Published by Appetite by Random House®, a division of Penguin Random House Canada Limited. Reproduced by arrangement with the Publisher. Purchase the book on Amazon below:
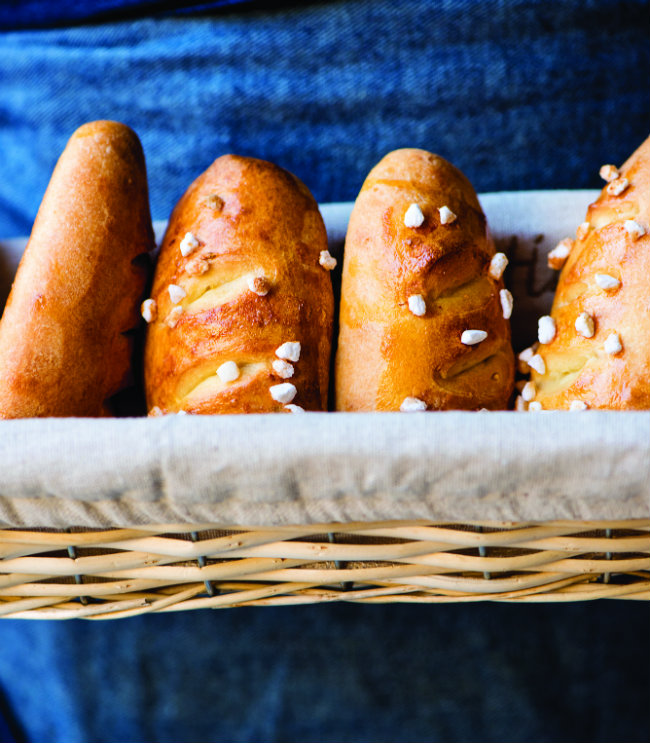
BREAKFAST ROLLS
Petits pains au lait
Makes 12 rolls | Active time: 30 minutes | Proofing time: 1 hour | Bake time: 20 to 25 minutes
These are buttery breakfast rolls (sometimes topped with chunky pearl sugar), not unlike brioche, which I discovered at the age of 17, when I was living as an exchange student in Brussels. My host mother would place a basket of fresh petits pains au lait on the table, along with some baking chocolate. I still remember the first day I sat at that breakfast table, wide-eyed as I watched my host sisters stuff squares of chocolate inside the little bread rolls. Bread + chocolate for breakfast? Pretty heavenly, right? If you’re not as much of a chocoholic as I am, these are also delicious fresh or toasted with butter and jam. Note that this recipe calls for a batch of the Simple Brioche Dough (below) so make sure you take this into account.
INGREDIENTS
Simple Brioche Dough (below)
1 egg, lightly beaten
1 tablespoon heavy (35%) cream
Pearl sugar, for decorating (optional)
1 Follow the Simple Brioche Dough recipe. Once your dough has rested for either 1 hour in a warm place or overnight in the fridge, line two baking trays with parchment paper. If your dough was in the fridge, let it sit for about 15 minutes before working with it.
2 Tip the dough out onto a large sheet of parchment paper on a countertop and divide it into 12 equal parts. I cut the dough in halves, then each half into three pieces, which I then cut into two.
3 Take each piece of dough, cup your hand around it and roll it around the parchment to form a smooth ball. Place the dough balls on one baking tray. There will be a seam underneath each dough ball – make sure that stays on the bottom as you place them on the tray.
4 Cover the rolls with a clean tea towel and leave them to rise in a warm place for 30 minutes.
5 Take one of the balls of dough and, using a rolling pin, gently roll it out to a circle about 3 inches (8 cm) in diameter. Flip it over so the smooth side is facing down. Fold the round in half so you have a semi-circle shape. Pinch the edges of the dough together with your fingers and press hard to make sure they stick. Place the dough seam side down back on one of the parchment- lined baking trays and press down gently. You’ll have what looks like a long dinner roll with somewhat pointed ends.
6 Repeat with the remaining dough, dividing the rolls evenly between the two baking trays so as not to crowd them.
7 Cover the baking trays with a clean tea towel and leave in a warm place for 30 minutes. Preheat the oven to 375 ̊F (190 ̊C).
8 Whisk the egg and cream together and brush the tops of the rolls with this egg wash. Use kitchen scissors to snip the top surface of the rolls, either in a zig-zag pattern or just three to four diagonal slits on each. Brush the egg wash on again once you have cut the tops and sprinkle the pearl sugar on top if using – approximately 2 teaspoons per roll.
9 Bake for 20 to 25 minutes, or until golden.
10 Remove from the oven and place them on wire racks to cool completely. These are best eaten the day you bake them, but you can also keep them in a resealable plastic bag for up to 3 days (they toast really well!) at room temperature.
“In the French Kitchen with Kids” by Mardi Michels. Photography © Kyla Zanardi.
SIMPLE BRIOCHE DOUGH
Pâte à brioche
Makes 12 breakfast rolls or 1 large brioche | Prep time: 20 minutes | Proofing time: 1 hour at room temperature (or overnight in the fridge plus 2 hours at room temperature the next day)
You can make this dough and use it immediately once it’s proved for an hour or you can pop it in the fridge overnight and let it prove at room temperature for 2 hours before you use it.
INGREDIENTS
3 1/3 cups (500 g) all-purpose flour
1⁄4 cup (50 g) granulated sugar
1 1⁄2 teaspoons instant yeast
1 teaspoon fine sea salt
1 cup (250 ml) 2% milk
1 large egg, lightly beaten
1⁄2 cup (113 g) unsalted butter, melted and slightly cooled
All-purpose flour, for sprinkling
1⁄2 tablespoon vegetable oil, for the proofing bowl
1 Place the flour, sugar, yeast and salt in a large bowl. Whisk to combine.
2 Heat the milk in a small pot over low heat to 110 ̊F (43 ̊C), measuring the temperature with a digital thermometer. If you are using a microwave, use a microwave-safe bowl and start with 30 seconds on high. If it’s not hot enough, you can continue to heat in increments of 15 seconds, to be sure not to overheat.
3 Pour the warm milk into the dry ingredients and stir with a wooden spoon until the dry ingredients are just combined. The mixture will be a little shaggy and dry at this stage.
4 Whisk the beaten egg and melted butter together to combine and then stir them carefully into the dough until the mixture comes together and all the dry ingredients are fully combined. This will be a fairly sticky mixture at first. I use a rubber spatula to press the dry ingredients into the dough when it seems like the wooden spoon can’t be of any more help.
5 Bring the dough together with your hands, still in the bowl, and start to knead until the dough comes together fully and starts to feel smooth.
6 Place the dough on a lightly floured surface, sprinkle it with a little more flour and start to knead. You’ll be kneading for 5 full minutes continually, so it’s a good idea to share this task with another person! To knead, you’ll need to stretch the dough away from you with the heel of one hand and pull it toward you with the other hand and then roll the dough into a ball. Knead a few times with the heel of your hand and then stretch the dough again. Continue like this for 5 minutes. The dough will be smooth and elastic by the time you’re done.
7 Pour around 1⁄2 tablespoon of vegetable oil into a large metal or glass bowl and use a paper towel to evenly coat the insides of the bowl with the oil. Place the dough in the bowl, cover tightly with plastic wrap and leave it to prove at room temperature for 1 hour. If you are not using the dough immediately, place the bowl in the fridge overnight. Note that if you are putting the dough in the fridge, it will also need around 2 hours’ proving at room temperature the next day.
8 Once the dough has proved, it’s ready to use.
Top tip: Use a stand mixer for the kneading (it’s much easier on the hands!). You’ll only need to work the dough for 3 to 5 minutes on medium speed.
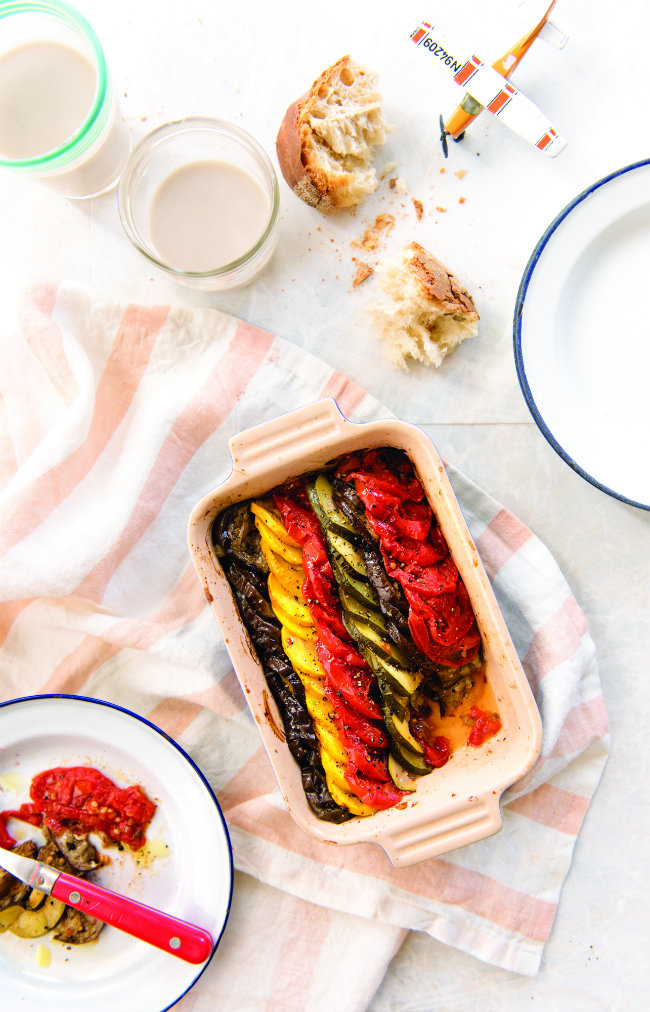
Ratatouille tian. Credit: “In the French Kitchen with Kids” by Mardi Michels. Photography © Kyla Zanardi.
RATATOUILLE TIAN
Serves 2 | Prep time: 25 minutes | Cook time: 65 to 75 minutes
You may not know what a tian is, but if you’ve seen the movie Ratatouille, you’ll be familiar with a version of this presentation of vegetables sliced thinly, cooked and served in an elegant stack. The dish you see in the movie was created by Chef Thomas Keller (of The French Laundry, among other restaurants), who was a consultant for the movie. My version of those stacked vegetables is a little easier for younger or novice cooks to assemble, but once you’ve mastered it, you’re well on your way to creating restaurant-worthy ratatouille! It’s important to choose vegetables that have a similar diameter so they stack evenly in the baking dish.
INGREDIENTS
1 small (3 1⁄2 oz/100 g) yellow onion, thinly sliced
2 cloves garlic, minced
2 tablespoons olive oil
1⁄2 teaspoon flaky sea salt
Freshly ground black pepper, for seasoning
2 baby or 1 small (7 oz/200 g) eggplant, thinly sliced
1 medium (5 oz/150 g) zucchini, thinly sliced
3 Roma tomatoes (10 oz/300 g), thinly sliced in rounds
1⁄2 teaspoon dried Herbes de Provence
Olive oil, for drizzling
Flaky sea salt and freshly ground black pepper, for seasoning
1 Preheat the oven to 400 ̊F (200 ̊C).
2 Place the onion slices and minced garlic in the bottom of a 5 x 7 inch (13 x 18 cm) baking dish. Sprinkle with 1 tablespoon of the olive oil, the 1⁄2 teaspoon flaky sea salt and some freshly ground black pepper.
3 Stack the eggplant slices upright against the long side of the dish so they are slightly overlapping each other. They should be quite tightly packed. Follow with a row of zucchini slices, arranged in the same manner. Next, make a row of tomato slices.
4 Continue in this manner until you have no more vegetable slices left. You should have enough vegetable slices and room to make at least two rows of each vegetable.
5 Drizzle 1 tablespoon of olive oil over the vegetables, sprinkle with the Herbes de Provence, cover the dish with aluminium foil and bake for 45 minutes.
6 Remove the foil from the dish, drizzle with a little more olive oil and bake, uncovered, for a further 20 to 30 minutes, until the vegetables are cooked through.
7 Season to taste. Serve warm or at room temperature.
Did you know that “tian” is the name not only for this baked vegetable stew but also the dish it’s cooked in? Traditionally, it means a shallow earthenware casserole dish, but you can use a ceramic baking dish for the same effect!
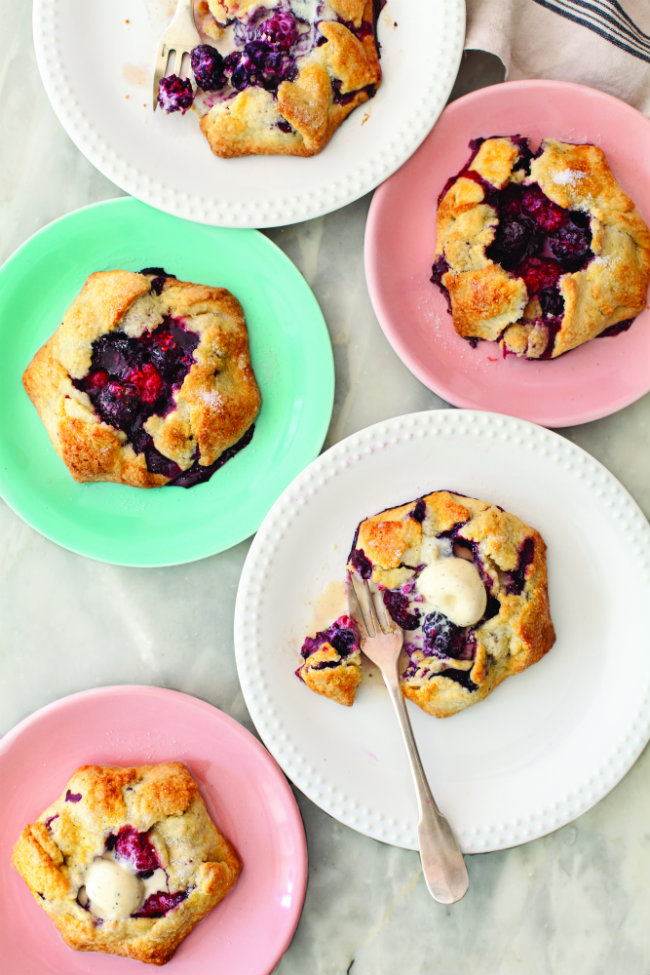
Mixed berry galettes. Credit: “In the French Kitchen with Kids” by Mardi Michels. Photography © Kyla Zanardi.
MIXED BERRY GALETTES
Petites galettes rustiques aux fruits rouges
Makes 8 galettes | Prep time: 30 minutes | Bake time: 25 to 30 minutes
Galettes were my introduction to the world of pastry and are still one of my favourite things to make. These single-crust pies are so easy that most kids can make them with very little supervision, and the fact that they are supposed to look rustic is a bonus for those who don’t feel con dent making a pie crust. The possibilities for filling a fruit galette are endless, but I’ve chosen mixed berries because they bake up so well and are so pretty. Once you have made one galette, you’ll be hooked! Note that you need to allow time to make
and chill the pastry before assembling and baking the galettes. You can make the pastry the day before if you like.
INGREDIENTS
For the pastry: see below
For the filling
2 cups (200 g) mixed berries (I like raspberries, blackberries and blueberries)
2 tablespoons granulated sugar
1 tablespoon cornstarch
1 tablespoon fresh lemon juice
Grated zest from 1 small lemon (about 1 tablespoon)
To assemble
1 large egg, lightly beaten for egg wash
Granulated sugar, for sprinkling
To serve
Vanilla ice cream or Chantilly cream
MAKE THE PASTRY
1 Prepare the sweet shortcrust pastry. See recipe below
MAKE THE FILLING
1 Combine the berries, sugar, cornstarch, lemon juice and zest in a small bowl. Stir to coat the berries thoroughly and set aside.
2 Preheat the oven to 350 ̊F (175 ̊C). Line two baking trays with parchment paper.
3 Divide the pastry into eight pieces and roll each piece out to a rough circle about 6 inches (15 cm) in diameter. If necessary, trim the rolled-out shapes with a pizza cutter so they are more or less round. Place the circles of dough on the parchment-lined baking trays. They should not be touching.
4 Use a 1⁄4-cup (60 ml) measure to divide the berry mixture evenly between the dough circles. Place the berries in the centre of the dough and use the bottom of the measuring cup to flatten them slightly. You should leave a border of about 1 1⁄2 inches (4 cm) around the edge.
Top tip: If your berries are quite large, you can cut them in half. If you do that, you might not need as much of the lemon juice, since cut berries may give off more juice.
ASSEMBLE THE GALETTES
1 Working with one circle at a time, fold the uncovered edges of dough up and around the filling, working your way around the circle. You’ll end up with pleated edges that are a little rough and you might need to trim some uneven parts to ensure you don’t end up with a thick area of just crust.
2 Brush the edges of each galette with a little egg wash and sprinkle the pastry with sugar.
3 Bake for 25 to 30 minutes, or until the pastry is golden and the berries are cooked.
4 Remove from the oven and place the galettes on wire racks to cool slightly. Serve warm or at room temperature with a scoop of vanilla ice cream or Chantilly cream.
Top tip: The word “galette” in French can have many meanings. Here, it describes an open-faced, single-crust tart but it can also mean savoury crêpes, a puff pastry dessert eaten at Epiphany or even shortbread cookies. Make sure you know which one you are ordering if you’re in a French restaurant.
This is an excellent entry-level dessert for novice bakers. Since the dough circles won’t be perfect and the berries will leak some juice out onto the baking trays anyway, they will all look a little mismatched but they are meant to be “rustic” (this is what I call anything I make that doesn’t turn out perfectly now!). Whenever I make these with my boys’ cooking club, nobody cares how they look. The boys think they are delicious and the parents are impressed their child made pastry from scratch!
SWEET SHORTCRUST PASTRY
Pâte sucrée
Makes one (10 inch/25 cm) tart shell; eight (6 inch/15 cm) individual galettes; or 20 (3 inch/7 cm) mini tart shells | Prep time: 30 minutes | Chilling time: 11⁄2 hours | Bake time: 35 to 40 minutes for a fully baked shell
This is an extremely versatile tart dough, and you can use it for all sorts of desserts – from simple recipes like Mixed Berry Galettes to mini jam tarts to something a little more refined like strawberry tart. The possibilities for this are endless.
INGREDIENTS
For the pastry
1 1⁄2 cups (225 g) all-purpose flour
1⁄4 teaspoon fine sea salt
1⁄4 cup (50 g) granulated sugar
1⁄2 cup (113 g) cold unsalted butter, cut into small cubes
1 large egg, lightly beaten
2 tablespoons heavy (35%) cream
For baking
Butter for greasing the pan
1 large egg, lightly beaten
1 Whisk the flour, salt and sugar together in a large bowl. Add the cubed butter and, using your fingertips, lightly rub the butter into the our until it resembles large breadcrumbs with some pieces the size of small peas. You can also use a pastry blender for this job.
2 Make a well in the middle of the our mix and add the egg. Using a wooden spoon, mix the egg into the flour until they are completely combined.
3 Add the cream and mix until the dough is firm enough to form a ball when you press the mixture together with your fingers – it might be a little crumbly, but form the dough into a disk and wrap it tightly in plastic wrap.
4 Refrigerate for a minimum of 1 hour, or up to 3 days, in the fridge. You can also freeze the dough, tightly wrapped in plastic, for up to 3 months. Thaw it overnight in the fridge before you roll and bake.
MAKE A 10 INCH (25 CM) PASTRY SHELL
1 Lightly grease a 10 inch (25 cm) tart pan, even if it’s a non-stick pan.
2 Remove the dough from the fridge, let it sit for a few minutes and roll it between two sheets of parchment paper until it’s about 12 inches (30 cm) in diameter.
3 Carefully peel off the top layer of the parchment and place your tart pan upside down on the pastry disk. Place one hand underneath the dough and the other on the tart pan and flip it over so you have the tart pan on the bottom and the dough on top. Gently peel the remaining parchment off the dough and press the dough into the pan. If your dough breaks in places you should have enough overhang to patch things up. Make sure to press it into the edges of the pan with your fingertips.
4 Once the pastry is pressed into the pan, use a rolling pin to roll around the edges of the top of the pan to remove any extra pastry at the sides.
5 Refrigerate the pastry shell for 30 minutes.
6 Partially or fully bake the shell, depending on your recipe.
As seen in France Today magazine
Share to: Facebook Twitter LinkedIn Email
Related Posts


Leave a reply
Your email address will not be published. Required fields are marked *